이전글에 이어 동일한 예제의 연속으로 설명을 진행합니다.
필요하다면 Compose 기본 #1편 [1] 을 먼저 보고 오시기 바랍니다.
이 글은 Android developer 공식 사이트에서 제공하는 문서를 기반으로 의역, 번역 하였습니다.[2]
유연한 Layout의 구성
기존에는 View Group에 속하는 여러 Layout으로 화면을 분할하고 view를 배치했습니다. Compose에서는 이전에 이미 사용해 봤던Column으로 Vertical 형태의 view를 쌓는 Layout을 구성할 수 있습니다. 마치 LinearLayout의 orientation=vertical 역할이라고 하면 좀더 이해가 쉬울것 같네요.
마찮가지로 horizontal 역할을 하는 Row 역시 존재합니다.
이 두가지 layout은 단순히 밑으로, 옆으로 view를 배치하지만, 여기에 가중치를 이용하여 적절하게 화면에 배치하도록 구성할 수 있습니다. (점점 LinearLayout과 동일해 지네요.)
이제 Weight를 이용해서 화면을 원하는대로 배치해 보겠습니다. LinearLayout과 컨셉은 동일하니 사실 화면 구성이나 Compose의 배치에 큰 이해를 필요로 하지는 않습니다. Compose에서 Weight를 표현하는 방법을 아는게 필요한거죠.^^
그전에 먼저 기본#1편 [1] 에서 사용했던 예제는 아래와 같습니다.
@Composable
fun TestScreenContents(texts: List<String> = listOf("Welcome", "compose world")) {
    val count = remember { mutableStateOf(0) }

    Column {
        texts.forEach {
            Greeting(it)
            Divider(color = Color.DarkGray)
        }
        CounterButton1(count.value) { newCnt -> count.value = newCnt }
    }
}

@Composable
fun CounterButton1(count: Int, updateCount: (Int) -> Unit) {
    Button(onClick = { updateCount(count + 1) }) {
        Text("Clicked Count#1: $count")
    }
}
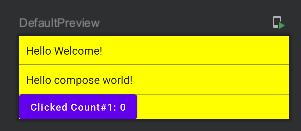
여기서 버튼을 최하단에 붙이고, 나머지 영역은 Column이 사용하도록 변경해 봅니다.
1. 먼저 전체 영역을 사용할 수 있도록 화면 전체를 사용하는 Column을 하나 만들어 다른 composable들을 감쌈니다. 이때 Modifier의 fillMaxHeight()를 사용합니다.
2. 버튼이 아닌 Hellow...를 표현하는 Column의 weight 역시 Modifier를 이용하여 1을 할당 합니다. 그럼 Button이 사용하는 공간을 제외한 모든 영역을 이 Column이 자치하겠죠? (LinearLayout에 weight로 화면을 구성하는 것과 동일합니다. 다만 orienataion이 vertical인 LinearLayout이 Column으로만 변경 되었다고 생각하면 이해하기가 수월합니다.)
@Composable
fun TestScreenContents(texts: List<String> = listOf("Welcome", "compose world")) {
    val count = remember { mutableStateOf(0) }

    Column(modifier = Modifier.fillMaxHeight()) {
        Column(modifier = Modifier.weight(1f)) {
            texts.forEach {
                Greeting(it)
                Divider(color = Color.DarkGray)
            }
        }
        CounterButton1(count.value) { newCnt -> count.value = newCnt }
    }
}
버튼이 제일 하단에 배치 되도록 했으나 크기는 Text 크기 만큼만 차지 하므로 하단의 width와 맞추기 위해 이번에는 fillMaxWidth()를 사용해 봅니다.
fun CounterButton1(count: Int, updateCount: (Int) -> Unit) {
    Button(
        onClick = { updateCount(count + 1) },
        modifier = Modifier.fillMaxWidth()
    ) {
        Text("Clicked Count#1: $count")
    }
}
원하는대로 잘 표현 되었네요.
여기서 Layout의 내용과는 별개로 Kotlin을 활용하여 클릭수에 따라 button의 배경색을 바꿔 보겠습니다.
@Composable
fun CounterButton1(count: Int, updateCount: (Int) -> Unit) {
    Button(
        onClick = { updateCount(count + 1) },
        modifier = Modifier.fillMaxWidth(),
        colors = ButtonDefaults.buttonColors(
            backgroundColor = if (count > 5) Color.Green else Color.White
        )
    ) {
        Text("Clicked Count#1: $count")
    }
}
여기서 ButtonDefaults는 버튼을 구성하는데 필요한 기본값을 저장하는 object입니다. 실제 타고 들어가 보면 아래와 같이 지정된 값을 확인할 수 있습니다.
/**
 * Contains the default values used by [Button]
 */
object ButtonDefaults {
    private val ButtonHorizontalPadding = 16.dp
    private val ButtonVerticalPadding = 8.dp

    /**
     * The default content padding used by [Button]
     */
    val ContentPadding = PaddingValues(
        start = ButtonHorizontalPadding,
        top = ButtonVerticalPadding,
        end = ButtonHorizontalPadding,
        bottom = ButtonVerticalPadding
    )

    /**
     * The default min width applied for the [Button].
     * Note that you can override it by applying Modifier.widthIn directly on [Button].
     */
    val MinWidth = 64.dp

    /**
     * The default min width applied for the [Button].
     * Note that you can override it by applying Modifier.heightIn directly on [Button].
     */
    val MinHeight = 36.dp

    /**
     * The default size of the icon when used inside a [Button].
     *
     * @sample androidx.compose.material.samples.ButtonWithIconSample
     */
    val IconSize = 18.dp
    ...
기본 padding과 Min/Max 값등을 가지고 있습니다. 또한 예제에서 사용했던 buttonColors는 아래와 같이 MaterialTheme 값을 기본값으로 참조하고 있음을 알 수 있습니다.
    /**
     * Creates a [ButtonColors] that represents the default background and content colors used in
     * a [Button].
     *
     * @param backgroundColor the background color of this [Button] when enabled
     * @param contentColor the content color of this [Button] when enabled
     * @param disabledBackgroundColor the background color of this [Button] when not enabled
     * @param disabledContentColor the content color of this [Button] when not enabled
     */
    @Composable
    fun buttonColors(
        backgroundColor: Color = MaterialTheme.colors.primary,
        contentColor: Color = contentColorFor(backgroundColor),
        disabledBackgroundColor: Color = MaterialTheme.colors.onSurface.copy(alpha = 0.12f)
            .compositeOver(MaterialTheme.colors.surface),
        disabledContentColor: Color = MaterialTheme.colors.onSurface
            .copy(alpha = ContentAlpha.disabled)
    ): ButtonColors = DefaultButtonColors(
        backgroundColor = backgroundColor,
        contentColor = contentColor,
        disabledBackgroundColor = disabledBackgroundColor,
        disabledContentColor = disabledContentColor
    )
....
LazyColumn
여러개의 데이터를 화면에 표시할 때 가장 많이 쓰는 형식이 List입니다. Column으로 list를 쉽게 표현할수는 있지만 대량의 데이터를 표현하기에 사실 Column은 적절하지 않습니다. Kotlin을 이용해서 for문으로 Column 내부의 구성 요소들을 반복시키면 되겠지만 어차피 화면에 보이지도 않을 component들 까지 모두 표기될꺼기 때문이죠.
일단 예상대로 비효율적일지 한번 시도해 보겠습니다.
@Composable
fun NameList(names: List<String>, modifier: Modifier = Modifier) {
    Column(modifier = modifier) {
        names.forEach {
            Greeting(it)
            Divider(color = Color.DarkGray)
        }
    }
}
일단 list를 표현할 함수를 하나 생성했습니다. 외부에서 이름 list를 받아 개수만큼 반복해서 view를 그립니다.
호출 부분도 바꿔야 되겠죠?
@Composable
fun TestScreenContents(names: List<String> = List(1000) {"Hello Compose $it"}) {
    val count = remember { mutableStateOf(0) }

    Column(modifier = Modifier.fillMaxHeight()) {
        NameList(names, Modifier.weight(1f))
        CounterButton1(count.value) { newCnt -> count.value = newCnt }
    }
}
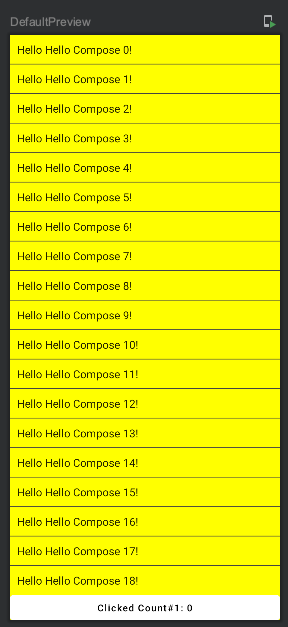
1000개의 이름 list를 만들고 만들어둔 NameList에 넘겨줬습니다. 미리보기를 하면 아래와 같습니다

원하는대로 잘 된것 같지만 실제 단말에 올려보면 보이는 그대로만 표기될뿐 스크롤되지 않습니다.
Column은 기본적으로 scrollable 속성을 갖지 않기 때문인데, 이를 위해서 LazyColumn을 사용하도록 변경해 보겠습니다. (물론 Column에도 속성을 추가하여 스크롤 가능하도록 만들수도 있습니다.)
LazyColumn은 기본적으로 items api를 제공하며, 여기에 표기할 다량의 데이터를 넘겨주면 됩니다.
@Composable
fun NameList(names: List<String>, modifier: Modifier = Modifier) {
    LazyColumn(modifier = modifier) {
        items(items = names) {
            Greeting(it)
            Divider(color = Color.DarkGray)
        }
    }
}
Android studio에서 preview는 동일하지만 실제 단말에 올려보면 스크롤되면서 하단의 데이터까지 모두 확인할 수 있습니다.
LazyColumn은 RecyclerView를 대체하는 Compose의 구성요소 입니다. 1000개의 데이터를 넘겼지만 화면에 표시하는 Component에 대해서만 recomposing되어 표시되기 때문에 효율적으로 화면을 구성합니다.
확인을 위해 아래와 같이 로그를 찍는 List로 다시 변경해 보겠습니다.
@Composable
fun NameListWithIndex(names: List<String>, modifier: Modifier = Modifier) {
    LazyColumn(modifier = modifier) {
        itemsIndexed(items = names) { index, item ->
            Log.i("ComposeTest", "NameListWithIndex() is called $index")
            Greeting(item)
            Divider(color = Color.DarkGray)
        }
    }
}
순서를 찍기 위해 items 대신 itemsIndexed를 사용했습니다. 이렇게 변경하여 단말에 올려보면 화면에 보이는 만큼만 로그를 찍습니다. 예를들어 화면에 10개의 List가 보이고 있다면 10개의 로그가 찍히고 스크롤에 따라서 보이는 아이템이 추가될때마다 로그가 찍힙니다.
즉 item이 화면에 표시될 때마다 매번 Composable을 호출하고 이에대한 결과로 UI를 방출하게 되는데, View를 재사용하는 RecyclerView와는 다른점 입니다. 하지만 Android.View를 매번 instantiating 하는거 보다는 저렴한 비용이기 때문에 효율적이라고 하네요. (아래의 원문을 가져왔습니다.)
Note: LazyColumn doesn't recycle its children like RecyclerView. It emits new Composables as you scroll through it and is still performant as emitting Composables is relatively cheap compared to instantiating Android Views.[2]
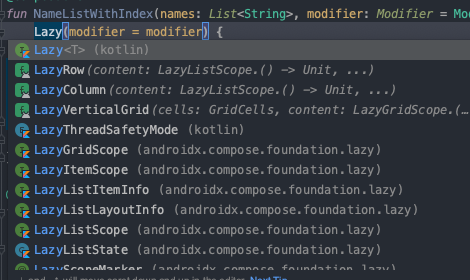
추가적으로 여기서는 다루지 않지만 LazyColumn이 존재하듯이 LazyRow도 존재 합니다. 또한 Lazy로 자동완성되는 API를 보면 아래와 같이 다양합니다. 전부 scrollable한 Composable을 나타내지는 않지만 다양한 Lazy api가 존재하므로 좀더 효율적인 화면을 구성할 수 있습니다.

그냥 넘어가긴 아쉬우니 LazyColumn -> LazyRow로 변경된 화면만 보고 넘어 가겠습니다.

당연히 해당 화면에서는 item들이 가로로 스크롤 되어 보여집니다.
Color Animation
기본#1 [1]에서 버튼에 색을 칠하는 방법을 알아봤습니다. 짧게 코드를 소개하면 아래와 같습니다.
@Composable
fun CounterButton1(count: Int, updateCount: (Int) -> Unit) {
    Button(
        onClick = { updateCount(count + 1) },
        modifier = Modifier.fillMaxWidth(),
        colors = ButtonDefaults.buttonColors(
            backgroundColor = if (count > 5) Color.Green else Color.White
        )
    ) {
        Text("Clicked Count#1: $count")
    }
}
하지만 이 컬러를 좀더 역동적으로? 표현하기 위해서 색 변화를 animation으로 처리할 수 있습니다. 버튼은 이전에 했으니 이번에는 list의 text 배경색을 바꿔보겠습니다.
Text가 선택되면 색칠하고, 재선택시 적용된 색상을 해제 하도록 합니다.
@Composable
fun Greeting(name: String) {
    var isSelected by remember { mutableStateOf(false) }
    val backgroundColor by animateColorAsState(
    			if (isSelected) Color.Red else Color.Transparent
                )

    Text(
        text = "Hello $name!",
        modifier = Modifier
            .padding(24.dp)
            .background(color = backgroundColor)
            .clickable(onClick = { isSelected = !isSelected })
    )
}
먼저 선택 여부를 저장할 변수가 필요합니다 .isSelected로 선언하며, recomposing시에도 유지되어야 하므로 remember로 처리 합니다.
그리고 animateColorAsState를 이용하여 색상을 선언합니다. 물론 이때 색상은 선택여부를 저장한 변수에 따라 달라집니다. 마지막으로 Text composable에 background color를 설정하고, clickable을 통해서 click 동작을 정의 합니다. (Text에는 onClick param이 존재하지 않으므로 modifier를 이용하여 지정합니다.)
animateColorAsState는 기존 색상에서 지정된 색상까지의 변화를 알아서 animation으로 만들어 줍니다. 여기서는 투명과 빨간색이 toggle되므로 점점 빨갛게 변하거나 점점 투명하게 변하는 중간색상은 알아서 만들어 animation으로 보여줍니다.

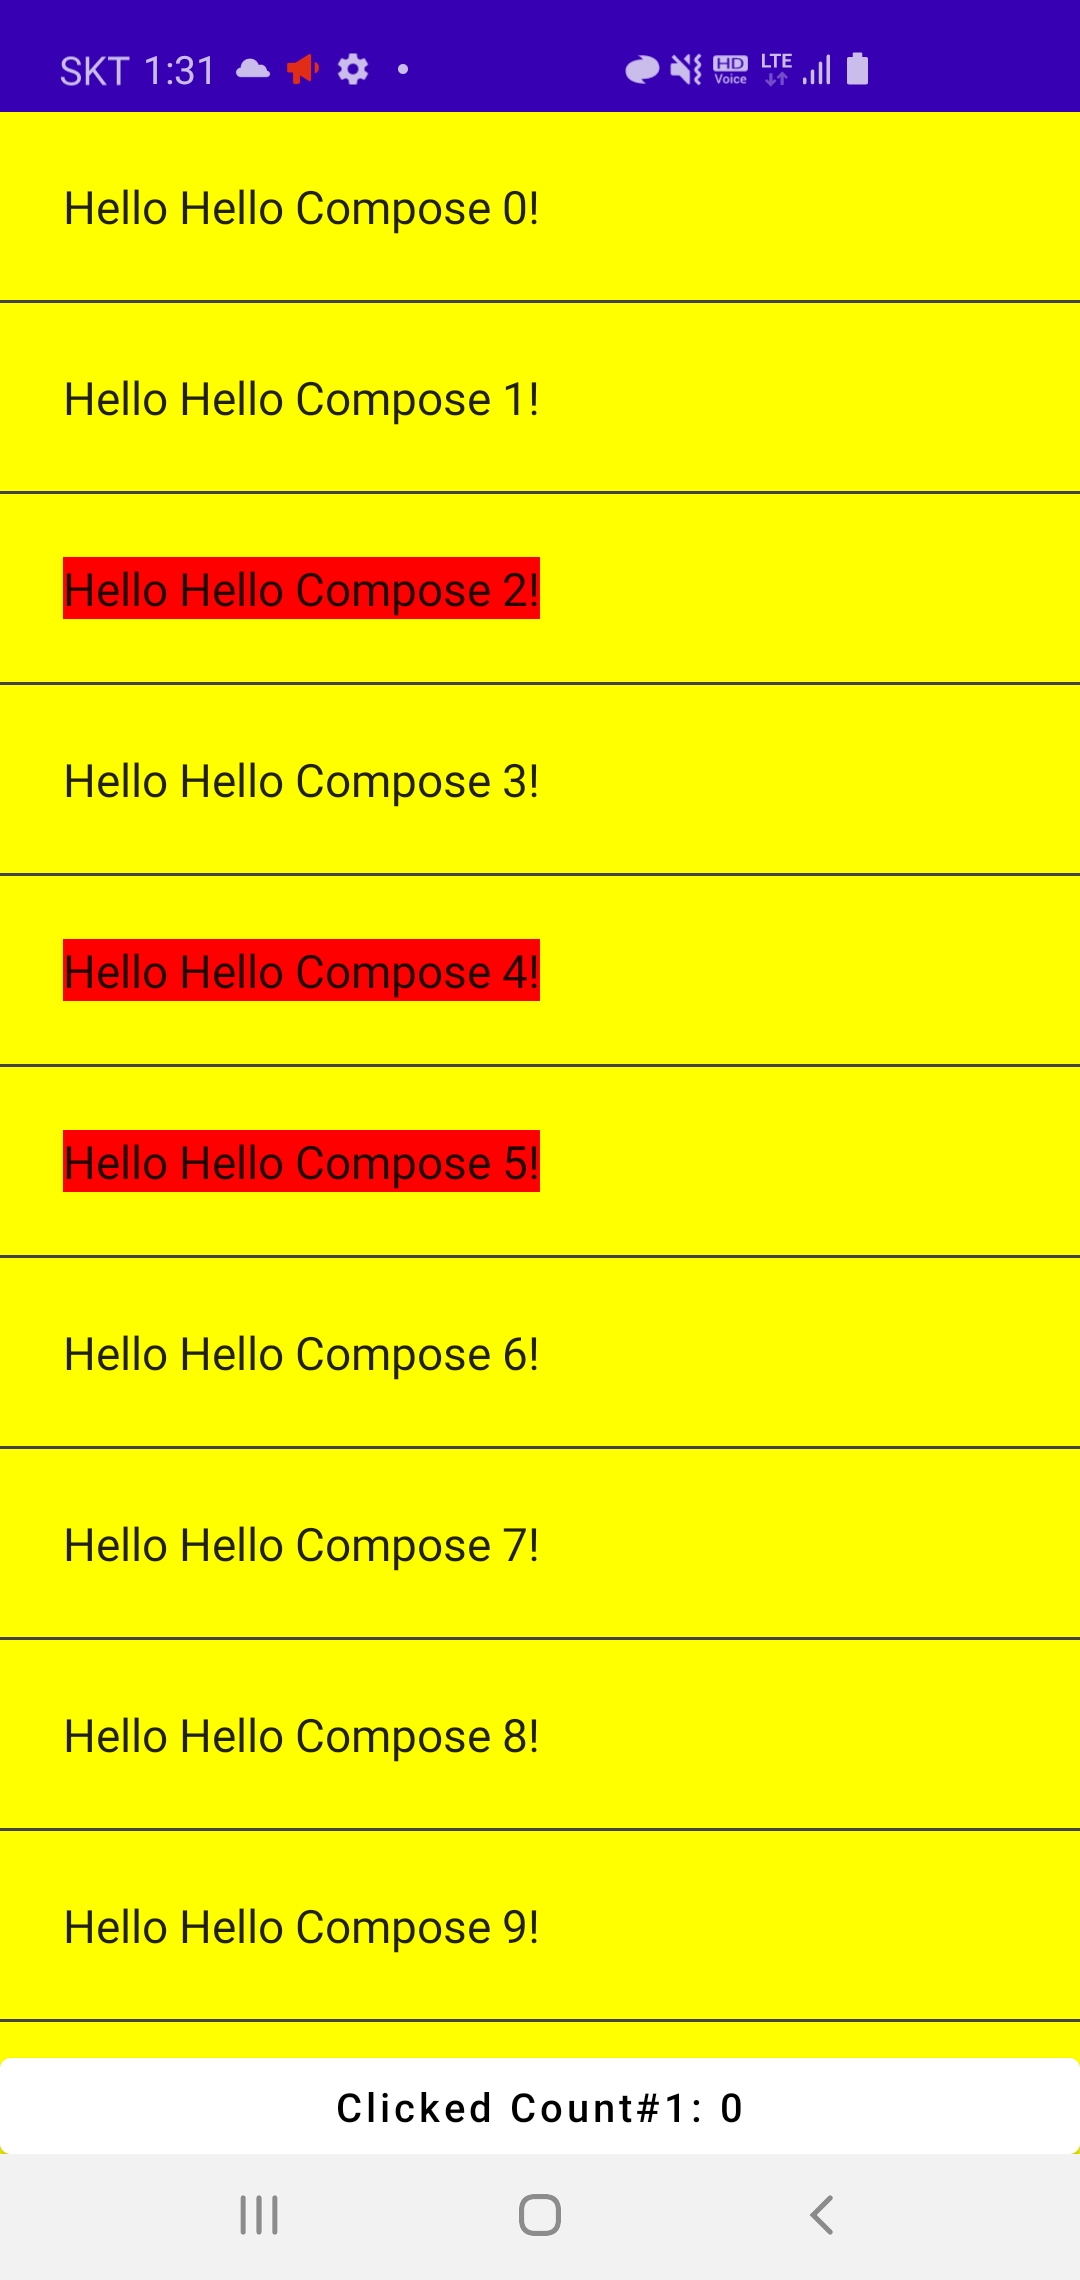
2,4,5번을 클릭한 상태로 자연스럽게 색상이 변했다가 풀리게 됩니다.
다만 여기서는 선택된 item이 스크롤 되어 화면에서 사라졌다가 다시 돌아오면 선택된 값이 유지되지 않습니다. 이는 isSelected값이 Greeting() 함수안에 존재하는데, nameList()는 스크롤될 때 마다 새로운 Greeting composable이 생성하기 때문입니다. (보이는 상태에서 값이 변경된다면 Greeting()이 recomposing 되겠지만 사라졌다가 다시 그려지게 되면 새로운 Greeting()이 생성됩니다.)
isSelected는 Text의 속성이지만 Greeting()까지 hositing 된 상태입니다. 하지만 스크롤시 유지를 위해서 nameList까지 한번 더 hoisting이 필요합니다.
@Composable
fun Greeting2(name: String, index: Int, isSelected: Boolean, click: (Int) -> Unit) {
    val backgroundColor by animateColorAsState(if (isSelected) Color.Red else Color.Transparent)

    Text(
        text = "Hello $name!",
        modifier = Modifier
            .padding(24.dp)
            .background(color = backgroundColor)
            .clickable(onClick = { click(index) })
    )
}
먼저 Gretting2() 함수에서는 isSelected 변수를 hoisting 시키기 위해 외부에 있다고 가정하고, 클릭시 동작전달을 위한 param을 추가합니다.
그리고 NameList까지 isSelected를 hoisting 시키고 param으로 넘겨줄 동작을 정의합니다.
@Composable
fun NameListWithIndex(names: List<String>, modifier: Modifier = Modifier) {
    val isSelectedList = remember { mutableStateMapOf<Int, Boolean>()}
    val onItemTextClicked: (Int) -> Unit = { index ->
        isSelectedList[index] = when (isSelectedList[index]) {
            true -> false
            else -> true
        }
    }

    LazyColumn(modifier = modifier) {
        itemsIndexed(items = names) { index, item ->
            Log.i("ComposeTest", "NameListWithIndex() is called $index")
            Greeting2(item, index, isSelectedList[index] ?: false, onItemTextClicked)
            Divider(color = Color.DarkGray)
        }
    }
}
다수의 selected를 저장해야 하므로 list의 index를 key 갖는 mutableStateMap을 사용하도록 합니다. 이와 같이 처리하면 선택한 아이템이 스크롤 되더라도 다시 스크롤이 돌아왔을때 selection을 유지할 수 있습니다.
App Theme 설정
처음 프로젝트를 생성할때 기본적으로 생성되었던 ui.theme package가 있습니다. 그 안에 Color.kt, Shape.kt, Theme.kt, Type.kt이 존재했으며 기본#1 [1] 포스팅 도입부에서 간략하게 설명했습니다. 여기서는 조금더 설명을 추가 하여 설명 합니다.
class MainActivity : ComponentActivity() {
    override fun onCreate(savedInstanceState: Bundle?) {
        super.onCreate(savedInstanceState)
        setContent {
            MyApp {
                TestScreenContents()
            }
        }
    }
}

@Composable
fun MyApp(content: @Composable () -> Unit) {
    ComposeTest1Theme {
        Surface(color = Color.Yellow) {
            content()
        }
    }
}
...
제가 생성했던 MainActivity는 위와 같은 모습을 갖습니다. setContent{} 에서 MyApp{}을 호출하며, MyApp{}은 전달받은 Composable 을 ComposeTest1Theme 안에서 수행합니다. ComposeTest1은 제가 생성한 프로젝트의 이름이며 (기본 package 명) ComposeTest1Theme 역시 프로젝트와 함께 기본적으로 생성되는 Theme 입니다. 이렇게 생성해 놓은 theme는 어떤 activity에서든지 재활용이 가능합니다.
Theme.kt 파일 내부를 보면 아래와 같습니다.
private val DarkColorPalette = darkColors(
    primary = Purple200,
    primaryVariant = Purple700,
    secondary = Teal200
)

private val LightColorPalette = lightColors(
    primary = Purple500,
    primaryVariant = Purple700,
    secondary = Teal200

    /* Other default colors to override
    background = Color.White,
    surface = Color.White,
    onPrimary = Color.White,
    onSecondary = Color.Black,
    onBackground = Color.Black,
    onSurface = Color.Black,
    */
)

@Composable
fun ComposeTest1Theme(
    darkTheme: Boolean = isSystemInDarkTheme(),
    content: @Composable() () -> Unit
) {
    val colors = if (darkTheme) {
        DarkColorPalette
    } else {
        LightColorPalette
    }

    MaterialTheme(
        colors = colors,
        typography = Typography,
        shapes = Shapes,
        content = content
    )
}ComposeTest1Theme가 내부에 포함하고 있는 MaterialTheme는 Android의 기본인 Material design specification을 구현하고 있는 Composable 입니다. ComposeTest1Theme 에서 넘겨받은 content를 MaterialTheme의 content로 넘겨주고 있기 때문에 위에서 구현했던 TestScreenContent()에 포함되는 모든 composable은 MaterailTheme의 영향을 받습니다.
위에서 Dark / Light에 따른 컬러값을 따로 지정하고, system 설정에 따라 theme의 color값을 변경하도록 if else문으로 분기해 놓았습니다.
또한 ComposeTest1Theme은 MaterialTheme theme인 포함하고 있기 때문에 어디서든지 MaterialTheme의 구성 요소에 접근하여 사용할 수 있습니다. 예를 들어 Greeting()에 존재하는 Text에 MaterialTheme의 style을 적용하고 싶다면 아래와 같이 구현이 가능 합니다.
@Composable
fun Greeting(name: String) {
    Text(
        text = "Hello $name!",
        modifier = Modifier
            .padding(24.dp)
            .style = MaterialTheme.typography.h1
    )
}
Typography 클래스를 타고 들어가 보면 다양한 형태의 text style를 받을수 있으며, 미 지정시 기본값으로 정의되어 있습니다.
@Immutable
class Typography internal constructor(
    val h1: TextStyle,
    val h2: TextStyle,
    val h3: TextStyle,
    val h4: TextStyle,
    val h5: TextStyle,
    val h6: TextStyle,
    val subtitle1: TextStyle,
    val subtitle2: TextStyle,
    val body1: TextStyle,
    val body2: TextStyle,
    val button: TextStyle,
    val caption: TextStyle,
    val overline: TextStyle
) {
    ...
    constructor(
        defaultFontFamily: FontFamily = FontFamily.Default,
        h1: TextStyle = TextStyle(
            fontWeight = FontWeight.Light,
            fontSize = 96.sp,
            letterSpacing = (-1.5).sp
        ),
        h2: TextStyle = TextStyle(
            fontWeight = FontWeight.Light,
            fontSize = 60.sp,
            letterSpacing = (-0.5).sp
        ),
        h3: TextStyle = TextStyle(
            fontWeight = FontWeight.Normal,
            fontSize = 48.sp,
            letterSpacing = 0.sp
        ),
        h4: TextStyle = TextStyle(
            fontWeight = FontWeight.Normal,
            fontSize = 34.sp,
            letterSpacing = 0.25.sp
        ),
        h5: TextStyle = TextStyle(
            fontWeight = FontWeight.Normal,
            fontSize = 24.sp,
            letterSpacing = 0.sp
        ),
        h6: TextStyle = TextStyle(
            fontWeight = FontWeight.Medium,
            fontSize = 20.sp,
            letterSpacing = 0.15.sp
        ),
        subtitle1: TextStyle = TextStyle(
            fontWeight = FontWeight.Normal,
            fontSize = 16.sp,
            letterSpacing = 0.15.sp
        ),
        subtitle2: TextStyle = TextStyle(
            fontWeight = FontWeight.Medium,
            fontSize = 14.sp,
            letterSpacing = 0.1.sp
        ),
        body1: TextStyle = TextStyle(
            fontWeight = FontWeight.Normal,
            fontSize = 16.sp,
            letterSpacing = 0.5.sp
        ),
        body2: TextStyle = TextStyle(
            fontWeight = FontWeight.Normal,
            fontSize = 14.sp,
            letterSpacing = 0.25.sp
        ),
        button: TextStyle = TextStyle(
            fontWeight = FontWeight.Medium,
            fontSize = 14.sp,
            letterSpacing = 1.25.sp
        ),
        caption: TextStyle = TextStyle(
            fontWeight = FontWeight.Normal,
            fontSize = 12.sp,
            letterSpacing = 0.4.sp
...
또한 해당 style의 특정 값이 변경하고 싶다면 copy를 통해서 부분 재정의도 가능합니다.
...
   style = MaterialTheme.typography.body1.copy(color = Color.Yellow)
...
References
[1] https://tourspace.tistory.com/403 - Compose 기본 #1
'개발이야기 > Android' 카테고리의 다른 글
| [Compose] 2. Layout의 기본(2/2) - Lazy List, Coil, Scroll, Sticky header (2) | 2021.09.05 |
|---|---|
| [Compose] 2. Layout의 기본(1/2) - CompositionLocal, Modifier, scaffold (0) | 2021.08.31 |
| [Compose] 1. 설정 및 기본 구성(1/2) - State, Hoisting, Recomposing (2) | 2021.08.21 |
| [SQLite] FTS table의 활용(FTS5) (2) | 2021.03.16 |
| [App bundle] Dynamic module Test #6 (0) | 2021.01.22 |
