Compose에 대한 내용을 언급하던 중에 Constraint layout이란 항목이 갑자기 튀어나옵니다. 한껏 Column, Row, Box란 view group 역할을 하는 composable을 한껏 제공해 주고 나서 말이죠. 게다가 Constraint layout은 기존 View group 방식에서 view group의 중첩, 다시 말해 layout의 depth가 깊어지는 걸 막기 위해 2017년에 새롭게 등장한 layout입니다.
CustomLayout에서 이미 봤듯이 Compose에서는 measure가 한 번만 가능하기 때문에 View의 depth가 깊어지더라도 문제가 발생하지 않습니다. 다만 Compose에서의 Constratin layout은 뷰의 구조가 복잡할 때, 여러 view들 간의 상호관계에 따른 배치를 좀 더 쉽게 가능하도록 하는 목적으로 사용됩니다.
추후 설명할 Compose의 constraint의 사용법은 기존 view system에서 사용하던 constraint layout과 거의 동일합니다. (코드로 표현하는 방법이 다를 뿐) 다만 목적은 "기존의 view system에서 사용된 것과는 다르다" 정도만 이해하고 있으면 이번 포스트팅은 어렵지 않게 클리어 가능할 것으로 생각됩니다.
이 글은 Android developer 공식 사이트에서 제공하는 문서를 기반으로 의역, 번역하였습니다. [1]
Gradle dependency
Constraint layout을 compose에서 사용하기 위해서는 따로 dependency가 필요합니다. 여기서 주의해야 할 점은 기본 compose의 버전을 따라가지 않는다는 겁니다.
implementation "androidx.constraintlayout:constraintlayout-compose:1.0.0-rc01"현재(2021.10.03) 기준으로 최신 버전입니다. 하지만 현재 최신 compose 버전은 1.0.3이며, 이 constraintlayout (1.0.0-rc01)을 쓰려면 kotlin은 1.5.30을 써야 합니다. (최신은 1.5.31인데 이걸 쓰면 빌드 오류가 납니다.)
정리하면 기본 compose 버전과는 다르게 진행된다는 것과 constraintlayout을 사용하기 위해서 kotlin 버전도 호환성 있는 버전으로 맞춰서 사용해야 한다는 점을 유념해 두어야 합니다.
ConstraintLayout in Compose works with a DSL
- Constraint layout에서 view들 간의 관계는 ID로 표현합니다. compose에서는 ID를 createRef(), createRefs()로 생성합니다.
- 생성된 ID를 각 Compose에 부여하기 위 해어 ConstraintAs() modifier를 제공하며, lambda block안에서 다른 compose와의 관계를 정의합니다.
- lambda block에서 관계를 정의할 때는 linkTo()를 이용합니다.
- Compose에서도 parent를 사용할 수 있으며 ConstraintLayout을 나타냅니다.
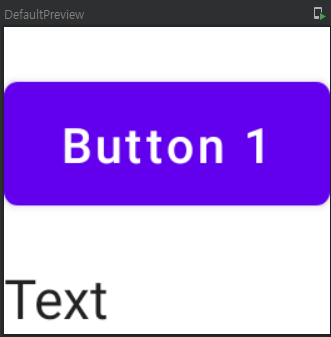
이제 버튼을 하나 만들고, 그 아래 text를 배치하는 간단한 형태를 구현해 보겠습니다.

@Composable
fun ConstraintLayoutContent() {
    ConstraintLayout {
        // Creates references for the two composables
        // in the ConstraintLayout's body
        val (button1, text) = createRefs()

        Button(
            onClick = { /* Do something */ },
            modifier = Modifier.constrainAs(button1) {
                top.linkTo(parent.top, margin = 16.dp)
            }
        ) {
            Text("Button 1")
        }

        Text("Text", Modifier.constrainAs(text) {
            top.linkTo(button1.bottom, margin = 16.dp)
        })

    }
}
먼저 각 compose에서 사용할 reference값 (기존 view system에서는 ID)를 생성합니다.
constraintAs()로 reference를 부여한 후에 해당 block안에서 linkTo로 관계를 정의합니다. 이미 기존 view system의 constraint layout에 익숙한 개발자라면 표현방법이 다를 뿐 동일한 형태로 사용한다는 걸 알 수 있습니다. 따라서 이해하기가 다른 compose 섹션보다는 쉽습니다.
여기서 Text버튼이 쏠려 있으니 가운데 정렬을 위해서 centerHorizontallyTo()를 이용해 보겠습니다. 이 function은 start와 end를 각각 parent의 양쪽 끝 edge로 선언하는 것과 동일한 효과를 갖습니다.
@Composable
fun ConstraintLayoutContent() {
    ConstraintLayout {
        ...

        Text("Text", Modifier.constrainAs(text) {
            top.linkTo(button1.bottom, margin = 16.dp)
            // Centers Text horizontally in the ConstraintLayout
            centerHorizontallyTo(parent)
        })

    }
}
parent의 중간에 위치하도록 Text를 설정했지만 결국 button1 기준으로 중간에 위치한것처럽 보입니다. 이는 constratinlayout 자체가 기본적으로 본인이 가진 contents를 wrap 한 사이즈를 사용하기 때문입니다. 다르게 말해 자기가 가진 자식 composables을 표현할 수 있는 최소한의 크기만을 사용합니다.
물론 전체 화면으로 확장해서 사용하기 위해 이미 다른 포스팅에서 여러 번 사용했던 modifier의 fillMaxSize나 size를 이용하면 됩니다.
Helpers
기존에 제공하던 Guide라든가, Barrier도 그대로 사용할 수 있습니다.
@Composable
fun ConstraintLayoutContent() {
    ConstraintLayout {
        // Creates references for the three composables
        // in the ConstraintLayout's body
        val (button1, button2, text) = createRefs()

        Button(
            onClick = { /* Do something */ },
            modifier = Modifier.constrainAs(button1) {
                top.linkTo(parent.top, margin = 16.dp)
            }
        ) {
            Text("Button 1")
        }

        Text("Text", Modifier.constrainAs(text) {
            top.linkTo(button1.bottom, margin = 16.dp)
            centerAround(button1.end)
        })

        val barrier = createEndBarrier(button1, text)

        Button(
            onClick = { /* Do something */ },
            modifier = Modifier.constrainAs(button2) {
                top.linkTo(parent.top, margin = 16.dp)
                start.linkTo(barrier)
            }
        ) {
            Text("Button 2")
        }
    }
}
이번에는 reference를 세 개 만들고 버튼 두 개와 Text를 하나 추가 했습니다.
Button1의 위치를 기준으로 Text는 button1의 아래에 위치시키고, Text의 중간이 button1의 끝이 오는 부분에 위치시켰습니다. 추가적으로 button1과 text의 끝 부분에 barrier를 만들고 button2의 시작은 barrier부터 하도록 연결합니다.

barrier 또는 그 이외의 다른 helper들은 constraintAs 영역 안에서 생성할 수 없습니다. 따라서 위 샘플 코드처럼 constraintAs의 lambda 영역 밖에서 선언해야 합니다.
Customizing dimensions
기본적으로 ConstraintLayout은 내부에 배치된 compose들이 자신들이 가진 item을 표시하는데 필요한 만큼을 size로 정하도록 허용합니다. 반대로 얘기하면 사이즈가 넘치는 compose가 배치되면 화면을 뚫고 나가게 됩니다.
@Composable
fun LargeConstraintLayout() {
    ConstraintLayout {
        val text = createRef()

        val guideline = createGuidelineFromStart(fraction = 0.5f)
        Text(
            "This is a very very very very very very very long text",
            Modifier.constrainAs(text) {
                linkTo(start = guideline, end = parent.end)
            }
        )
    }
}

@Preview
@Composable
fun LargeConstraintLayoutPreview() {
    LayoutsCodelabTheme {
        LargeConstraintLayout()
    }
}
코드에서는 분명히 end = parent.end로 했지만 지켜지지 않습니다. 따라서 기존 동작처럼 constraintLayout을 넘어가면 줄 바꿈 되어 잘 표시될 수 있도록 하기 위해서는 width를 제한해야 합니다.
@Composable
fun LargeConstraintLayout1() {
    ConstraintLayout {
        val text = createRef()

        val guideline = createGuidelineFromStart(fraction = 0.5f)
        Text(
            "This is a very very very very very very very long text",
            Modifier.constrainAs(text) {
                linkTo(start = guideline, end = parent.end)
                width = Dimension.preferredWrapContent
            }
        )
    }
}
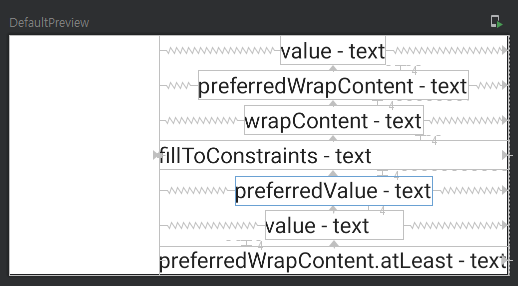
사용 가능한 Dimension값들은 아래와 같습니다.
- preferredWrapContent : constraints의 내부 공간에 맞춰 wrap content를 합니다.
- contaraint 내부 공간에 맞추면서 기본 크기도 적용할 수 있습니다. e.g. Dimemsion.preferredWrapContent.atLeast(100.dp)
- wrapContent: 첫 번째 예제처럼 constraints 내부 공간과는 상관없이 item을 감쌀 수 있을 만큼을 크기로 갖습니다.
- fillToConstraints: constraint에 선언된 값만큼 constraint 내부를 확장해서 채웁니다.
- preferredValue: constraint내부 공간에서 preferredValue에 선언된 dp 값만큼을 크기로 갖습니다.
- value: constraint와 상관없이 선언된 dp값만큼을 크기로 갖습니다.
짧은 content ("Text")를 갖는 경우 아래와 같이 표현됩니다.

만약 긴 content("This is a very very very very very very very long text")를 갖는다면 아래와 같이 표현됩니다.

Decoupled API
지금까지는 constraintLayout 내부의 composable들이 각각 다른 composable과의 관계를 직접 modifier내부에서 정의했습니다. 하지만 기존의 composable 사용방법처럼 composable은 관련 reference들 정도만 할당하고, reference의 생성 및 관계 설정은 다른 곳에 할 수도 있습니다.
ConstraintSet을 미리 생성하여 관계를 정의하고 이 set을 ConstraintLayout 생성 시 param으로 넘겨줍니다. ConstraintLayout내부에서는 ConstratinSet에서 미리 관계를 다 정의해 놓은 layout id만 할당받도록 합니다.
아래 예제는 맨 처음 button1과 text를 표현하는 예제를 decopuling 시켜 표현한 코드입니다.
@Composable
fun DecoupledConstraintLayout() {
    BoxWithConstraints {
        val constraints = if (maxWidth < maxHeight) {
            decoupledConstraints(margin = 16.dp) // Portrait constraints
        } else {
            decoupledConstraints(margin = 32.dp) // Landscape constraints
        }

        ConstraintLayout(constraints) {
            Button(
                onClick = { /* Do something */ },
                modifier = Modifier.layoutId("button")
            ) {
                Text("Button")
            }

            Text("Text", Modifier.layoutId("text"))
        }
    }
}

private fun decoupledConstraints(margin: Dp): ConstraintSet {
    return ConstraintSet {
        val button = createRefFor("button")
        val text = createRefFor("text")

        constrain(button) {
            top.linkTo(parent.top, margin= margin)
        }
        constrain(text) {
            top.linkTo(button.bottom, margin)
        }
    }
}
References
[1] https://developer.android.com/codelabs/jetpack-compose-layouts#9
[2] https://developer.android.com/jetpack/compose/layouts/constraintlayout#0
[3] 2021.09.30 - [개발이야기/Android] - [Compose] 7.Custom Layout
'개발이야기 > Android' 카테고리의 다른 글
| [Compose] 11. State holder (0) | 2021.10.11 |
|---|---|
| [Compose] 10. Intrinsic Measure (0) | 2021.10.04 |
| [Compose] 8. Complex custom layout - staggered layout (0) | 2021.10.01 |
| [Compose] 7.Custom Layout (0) | 2021.09.30 |
| [Compose] 6. Side-effects - LaunchedEffect, rememberCoroutineScope, rememberUpdatedState, DisposableEffect, SideEffect, produceState, derivedStateOf, snapshotFlow (13) | 2021.09.25 |
